CI Maintenance
Key Takeaways
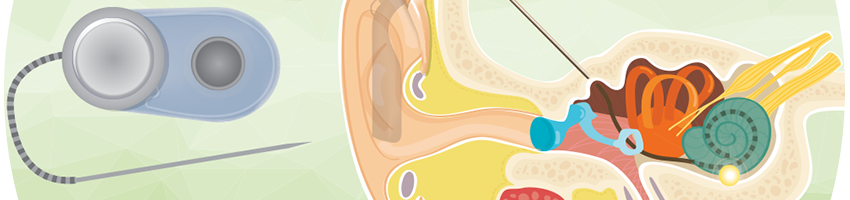
The external parts of your cochlear implant – the microphone, processor, and transmitter or headpiece – need regular maintenance.
Frequently check your cochlear implant for damage, dirt, and/or moisture, clean your cochlear implant, and use a desiccation system for storage.
Frequently replace your microphone protectors or covers and your batteries.
Overview
A cochlear implant has many parts, including a transmitter or headpiece, microphone, receiver, processor, batteries, and electrode array. Watch the video below to learn more about the different parts of a cochlear implant.
The external parts of your cochlear implant are the ones you can see – the microphone, processor, and transmitter or headpiece. These parts of your cochlear implant need regular maintenance.
One of the most important parts of maintenance is to wear your cochlear implant as much as possible during waking hours. This ensures you are learning how to use your cochlear implant, getting used to different hearing environments, and noticing any changes in sound quality. These changes in sound quality could mean a part of your cochlear implant requires maintenance or repair.
Another important part of maintenance is making sure that the external parts of your cochlear implant remain clean. You should frequently check the external parts of your cochlear implant for damage, dirt, and/or moisture. If these parts need cleaning, first clean your hands, and then clean the parts with a dry, non-abrasive cloth. Be careful to always protect and cover your cochlear implant when using hairspray or another product.
Some parts of your cochlear implant will require replacement. You will need to replace your microphone protectors or covers about once every three months. If you live in a higher-humidity environment, sweat frequently, or notice changes in sound quality, you will need to replace them more often. You will also need to frequently replace the batteries in your processor. Click here to learn more about how to replace your batteries.
Because most cochlear implants are not waterproof, you need to keep your cochlear implant dry. This can sometimes be difficult if you live in a very hot and humid place. If your cochlear implant gets wet (even through humidity), use a desiccation system or drying system, which removes moisture. Desiccation systems are called different names depending on your manufacturer and brand, but some examples are Dry & Store,TM Drying Kit,TM Dry Box,TM or Dry Brik.TM
Maintaining your cochlear implant can be difficult, but you will get better over time. Click here to download a maintenance checklist to help.
CI Maintenance
Key Takeaways
Despite regular maintenance, sometimes your cochlear implant may have technical problems that need troubleshooting.
The first step to troubleshooting your device is to check the external parts, including the wires, for breaks, fraying, or damage.
The next step is to try resetting your processor by turning the processor off, removing the batteries, waiting 20-30 seconds, reinserting the batteries, and then turning the processor back on.
For specific troubleshooting issues, always reference your cochlear implant user manual or contact your cochlear implant manufacturer.
Troubleshooting
Despite regular maintenance, sometimes your cochlear implant may have technical problems that need troubleshooting. There are steps you can take to troubleshoot your cochlear implant before contacting your cochlear implant manufacturer.
The first step to troubleshooting your device is to check the external parts, including the wires, for breaks, frays, or damage. If there is obvious damage, you may need to order a new part.
If there is no obvious damage, you should first check whether your batteries need replacing. Some processors and microphones have a low-battery indicator. This indicator may be an icon on the processor display window, a flashing light near the microphone, or an audible beep.
The next step is to reset your processor. To do this, turn off the processor and remove the batteries. Wait 20-30 seconds and then turn the processor back on with the batteries.
If you have back-up cochlear implant parts, you can also test each part individually. Remove the part you are troubleshooting and then insert your back-up part. If your cochlear implant is now working, the original part was broken. You can repeat this process with as many individual parts that you have back-up parts for. You can then order the specific part from your manufacturer for replacement.
For specific troubleshooting issues, always reference your cochlear implant user manual. For more advanced troubleshooting, contact your cochlear implant manufacturer.
CI Maintenance
Key Takeaways
You do not need to remove your cochlear implant to walk through the metal detectors at airport security and you do not need to turn off your cochlear implant during airplane takeoff or landing.
Print an information card that explains your hearing loss and cochlear implant for various travel, security, and airport staff.
Pack your back-up cochlear implant parts in your carry-on luggage, so you always have access to them.
Traveling
This section mostly focuses on air travel. Car travel can also be a difficult hearing environment. Click here to learn more about strategies for car travel.
You do not need to remove your processor and/or headpiece to walk through the metal detectors or body scanners during the airport security screening process. Your cochlear implant may activate the scanner. If so, inform the Transportation Security Administration (TSA) agent about your cochlear implant verbally or show them an information card. Click here to download a traveling tips handout, which includes an information card. The TSA agent may then request to inspect your cochlear implant or conduct a pat-down inspection. If you decide to remove your processor and/or headpiece, let the staff know you will not be able to hear them – either verbally or with your information card. Some airports have services for adults with cochlear implants, such as expedited check-in, security, and transportation. Make sure to check with a staff member about these services when you check in.
Make sure to check the gate screens frequently, as you may not be able to hear a gate change over the intercom or public address (PA) system with the background noise. If you are unsure of where a gate screen is, ask an airport staff member, and explain about your cochlear implant, either verbally or with your information card. Make sure to ask if the airport has installed an audio induction loop system to help you hear gate changes and other announcements.
It is important to always carry back-ups of your cochlear implant parts in case of emergencies. It is also recommended that you pack these back-ups in your carry-on baggage, not checked baggage, so you always have access to them. It may be easier to pack all your cochlear implant back-up parts in one container for easy access and organization. If so, label this container with your name and address in case it gets lost.
While flying, your cochlear implant does not interfere with the plane’s systems. This means you do not need to turn off your cochlear implant during airplane takeoff or during landing. However, if you use a remote assistant or controller, you should turn off this device during airplane takeoff and landing as you do with your other electronics. Before takeoff, you should also inform the flight attendant about your hearing loss, either verbally or with your information card, so the attendant can assist you in case of an emergency.
You may also wish to bring assistive technologies when traveling, including your favorite alarm clock, and any connecting accessories. Hotel alarm clocks are not always designed for individuals with hearing loss, so bring yours from home, if you have one you frequently use. Connecting accessories link different media devices to your cochlear implant. These accessories are often cables, like a personal audio cable, that plug directly into your cochlear implant and into the media device, like the in-flight TVs or your cell phone. Click here to learn more about how assistive devices can help you in challenging hearing environments. Also, if you are traveling internationally, remember to pack the country-specific power converters or bring enough disposable batteries to last the entire duration of your trip.